Carbone Studio authentication (self hosted installation) with Oauth2 identity provider

Introduction
The self-hosted Carbone solution gives you the ability to run Studio in your own environment.
By default, access to both the Studio and the API is open. To secure the API, simply enable the CARBONE_EE_AUTHENTICATION environment variable and generate API keys for each client.
As for the Studio, you may want to authenticate users through an OAuth identity provider.
One approach is to set up an OAuth Proxy.
This article walks through an implementation using oauth2-proxy and Google as the identity provider. The deployment is handled with Docker.
Global target architecture
Here is what we want to implement:
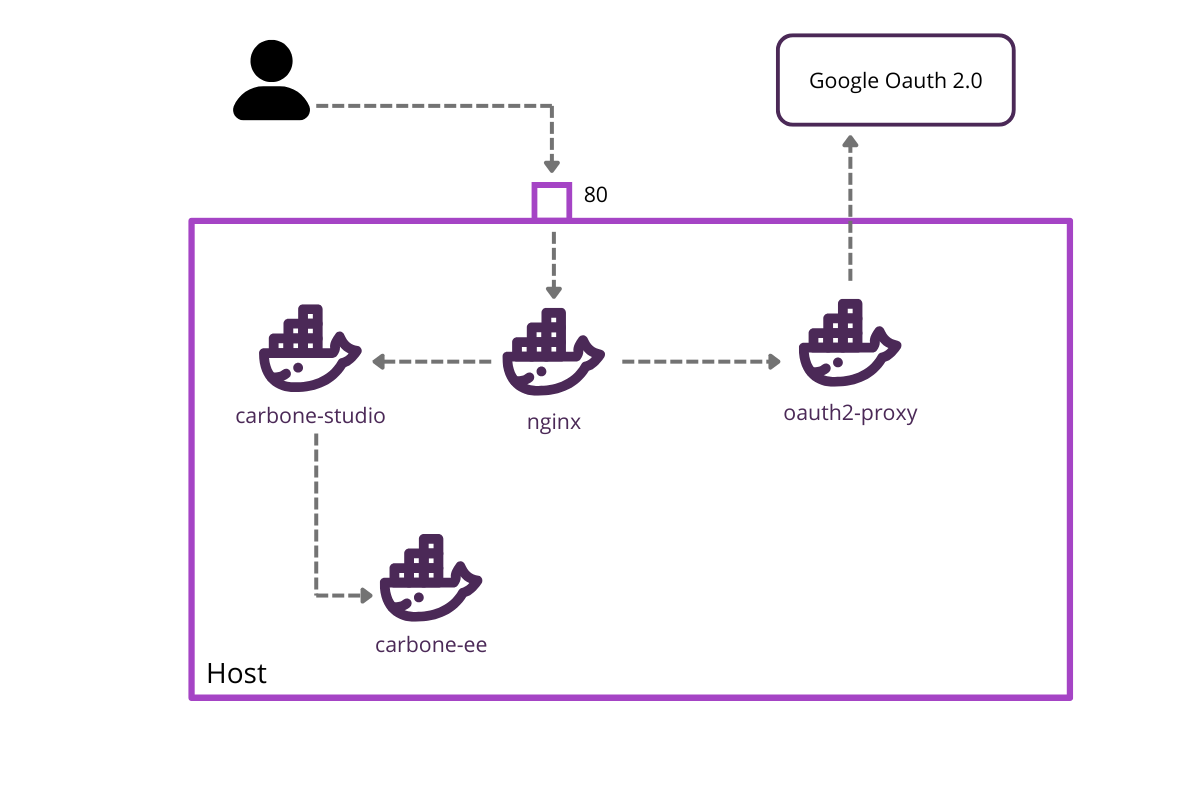
To access Carbone Studio, the user goes through a reverse proxy (nginx) that verifies and authenticates the client using oauth2-proxy.
Carbone Studio is placed in a separate carbone-ee instance to simulate an advanced integration using the Studio Web Component.Setting Up the Carbone microservice
The first step is to set up the Carbone service that will expose the API. The configuration is minimal — the Studio is not enabled and no license is required at this stage.
Add the following to your docker-compose.yml:
services:
  carbone:
    image: carbone/carbone-ee:full
    networks:
      - internal-network

networks:
  internal-network:
    driver: bridge
internal-network is a private bridge network used to isolate and connect the microservices securely.Setting Up the Carbone Studio integration
The second step simulates a client application embedding Carbone Studio. We use an nginx Docker image serving a minimal web application.
Add this to your docker-compose.yml:
  carbone-studio:
    image: nginx:alpine
    container_name: carbone-frontend
    volumes:
      - ./html:/usr/share/nginx/html:ro
    restart: unless-stopped
    networks:
      - internal-network
In the html folder, create the following index.html:
<!DOCTYPE html>
<html lang="en" style="height:100%;">
 <head>
   <meta charset="UTF-8">
   <meta name="viewport" content="width=device-width, initial-scale=1.0">
   <title>Carbone Studio Quick Test</title>
   <meta name="color-scheme" content="light">
   <style>
     html, body { height:100%; margin:0; }
     carbone-studio { width:100vw; height:100vh; }
   </style>
 </head>
 <body></body>
 <script src="https://bin.carbone.io/studio/5.1.1/carbone-studio.min.js"></script>
 <script>
   // Create and append the studio component, starting in "off" mode for silent initialization
   const studio = document.createElement('carbone-studio');
   studio.setAttribute('carbone-mode', 'off');
   document.body.appendChild(studio);

   window.addEventListener('DOMContentLoaded', () => {
     studio.setConfig({
       // Point this to your local Carbone On-Premise instance!
       origin : 'http://localhost/api',
       mode   : 'embedded-versioning', // enables versioning features

       fetchOverride    : async (url, options) => {
            // original browser fetch function to include oauth2 cookie
            const response = await fetch(url, { ...options, credentials: 'include' });

            if (response.status === 401) {
              console.warn("Session expired, redirect to login");
              setTimeout(() => {
                  window.location.href = '/login';
              }, 1000);
          }

          return response;
        }
     });
     // Example: open an online test template with some sample data
     studio.openTemplateURL('http://localhost/template.docx', 'http://localhost/data.json');
   });
 </script>
</html>
A few things worth noting here:
credentials: 'include'ensures the OAuth2 cookie is sent with every request.- The
fetchOverrideintercepts 401 responses and redirects the user to the login page automatically.
Setting Up the Reverse Proxy
The next step is to configure the reverse proxy that exposes three routes:
/→ Carbone Studio/api→ Carbone API/oauth2→ Authentication endpoints
We use nginx with the following nginx.conf:
events {
    worker_connections 1024;
}

http {
    server {
        listen  80;
        server_name localhost;

        location /oauth2/ {
            proxy_pass       http://oauth2-proxy:4180;
            proxy_set_header Host                    $host;
            proxy_set_header X-Real-IP               $remote_addr;
            proxy_set_header X-Auth-Request-Redirect $request_uri;
        }

        location /api/ {
            auth_request /oauth2/auth;

            error_page 401 = http://localhost/oauth2/start?rd=$scheme://$host$request_uri;

            proxy_pass http://carbone:4000/;
        }

        location / {
            auth_request /oauth2/auth;

            error_page 401 = http://localhost/oauth2/start?rd=$scheme://$host$request_uri;

            proxy_pass http://carbone-studio/;
        }
    }
}
The auth_request directive delegates authentication to oauth2-proxy before forwarding any request. Unauthenticated users are automatically redirected to the login flow.
Use a custom nginx Docker image with the following Dockerfile:
FROM nginx:latest

COPY nginx.conf /etc/nginx/nginx.conf

EXPOSE 80
EXPOSE 443

CMD ["nginx", "-g", "daemon off;"]
Then declare the proxy service in docker-compose.yml:
  carbone-proxy:
    container_name: nginx
    build:
      context: ./gateway
      dockerfile: Dockerfile
    depends_on:
      - carbone
    ports:
      - 80:80
    networks:
      - internal-network
Configuring oauth2-proxy
The final step is to configure oauth2-proxy.
Step 1 — Create an OAuth2 client on the GCP Console. You will receive a Client ID and a Client Secret.
Step 2 — Generate a cookie secret:
dd if=/dev/urandom bs=32 count=1 2>/dev/null | base64 | tr -d – '\n' | tr – '+/' '-_' ; echoStep 3 — Add the credentials to your .env file:
OAUTH2_PROXY_CLIENT_ID=<Your Client ID>
OAUTH2_PROXY_CLIENT_SECRET=<Your Client Secret>
OAUTH2_PROXY_COOKIE_SECRET=<Cookie Secret>
Step 4 — Declare the service in docker-compose.yml:
  oauth2-proxy:
    container_name: oauth2-proxy
    image: quay.io/oauth2-proxy/oauth2-proxy:latest
    environment:
      - OAUTH2_PROXY_CLIENT_ID=${OAUTH2_PROXY_CLIENT_ID}
      - OAUTH2_PROXY_CLIENT_SECRET=${OAUTH2_PROXY_CLIENT_SECRET}
      - OAUTH2_PROXY_COOKIE_SECRET=${OAUTH2_PROXY_COOKIE_SECRET}
      - OAUTH2_PROXY_EMAIL_DOMAINS=*
      - OAUTH2_PROXY_REVERSE_PROXY=true
      - OAUTH2_PROXY_REDIRECT_URL=http://localhost/oauth2/callback
      - OAUTH2_PROXY_COOKIE_SECURE=false
      - OAUTH2_PROXY_UPSTREAM=http://carbone:4000
      - OAUTH2_PROXY_HTTP_ADDRESS=http://0.0.0.0:4180
      - OAUTH2_PROXY_SET_AUTHORIZATION_HEADER=true
      - OAUTH2_PROXY_SET_XAUTHREQUEST=true
      - OAUTH2_PROXY_WHITELIST_DOMAINS=.localhost:8080,.localhost
    command:
      - --http-address=0.0.0.0:4180
      - --upstream=http://carbone:4000
      - --skip-auth-preflight=true
    networks:
      - internal-network
Running and Testing
Start all services with:
docker compose up -dCarbone Studio is now available at http://localhost. On the first visit, users will be prompted to authenticate via Google.
Once authenticated, an _oauth2_proxy cookie is created and used for subsequent requests.
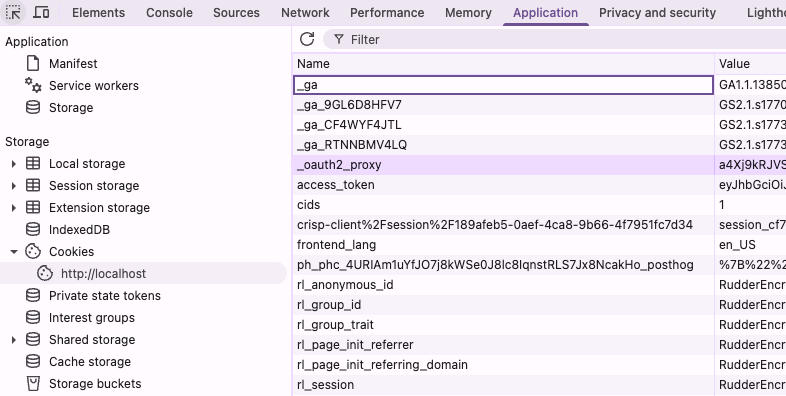
To re-trigger the login flow, simply delete the cookie.
References
Full example : https://github.com/carboneio/carbone-ee-docker/tree/v5/deployement/docker-compose/proxy-auth
Oauth2-proxy documentation : https://oauth2-proxy.github.io/oauth2-proxy/