Beyond QWeb: generating your Odoo documents with Carbone

Odoo natively generates its documents (quotations, invoices, delivery notes, and so on) with QWeb, its own HTML/XML-based templating engine that outputs PDF. That works fine for standard use, but any real customization stays in developer territory:
| QWeb (native) | Carbone | |
|---|---|---|
| Output format | PDF only (Excel/Word require a third-party module) | DOCX, XLSX, PDF, ODT, PPTX from a single template |
| Editing the template | XML/HTML, developer mode or Odoo Studio (paid) | A Word/Excel file, editable by a non-technical user |
| QR code / barcode | Possible via an internal controller, called in XML with a hand-built URL | A single tag (:barcode), a hundred-plus formats, no XML |
| Subtotals / aggregates | Computed field in Python on the model | Right in the tag (:aggSum, :aggCount...) |
| Deploying a change | Update the module, redeploy | Replace the Word/Excel file in the report config |
The Carbone for Odoo module therefore shifts document customization out of a developer's hands and into those of the business teams. In this article, we start from a concrete case — a delivery note generated from a batch transfer grouping several delivery orders — and build the template from scratch, all the way to adding a QR code and a barcode.
The scenario
We use an Odoo batch transfer: several individual delivery orders (one per warehouse or per shipment) grouped into a single dispatch. It's a native Odoo feature (Inventory > Batch Transfers), useful whenever a customer receives an order in several parcels.
On this document, we want to:
- List every product across all transfers, each with its source delivery order
- Automatically flag a partial delivery (backorder) with no formula to maintain
- Add a tracking QR code and a barcode that can be scanned in the warehouse
1. Install the module
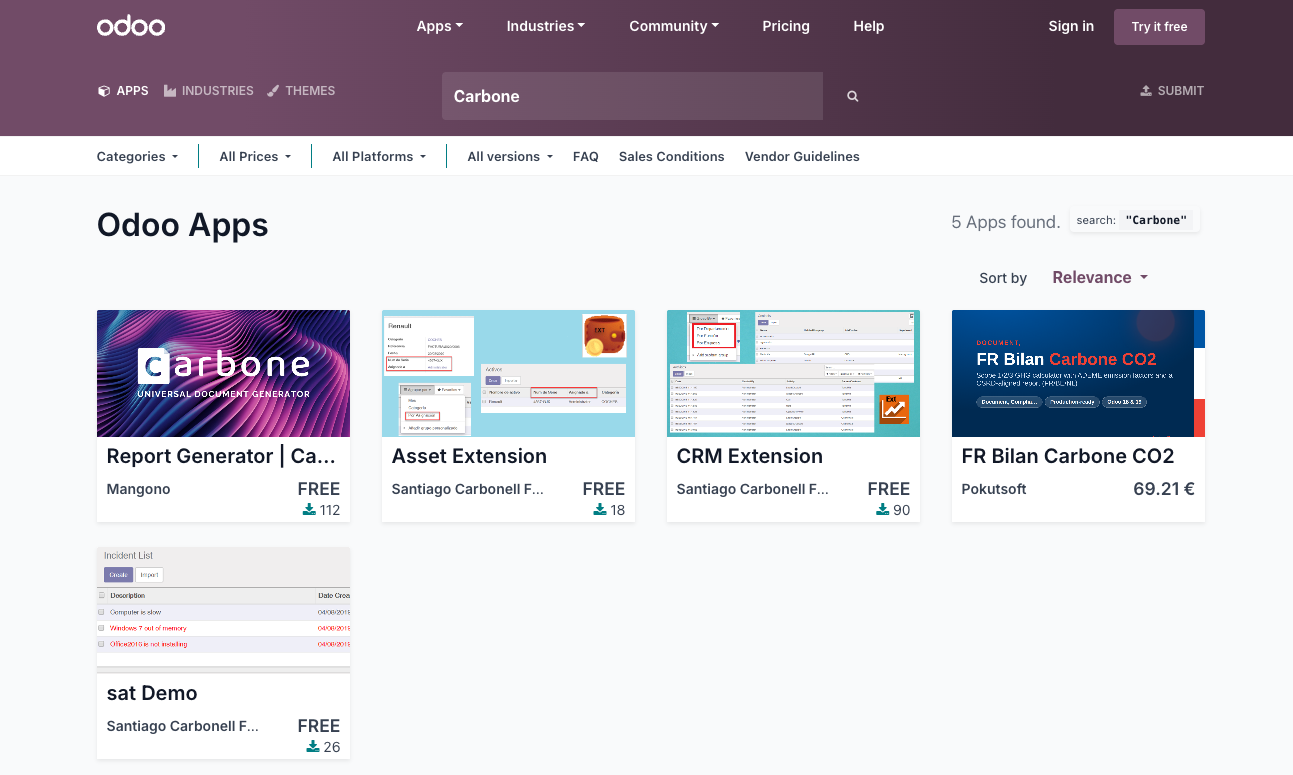
From Odoo's Apps menu, search for "Carbone" and click Install. Once active, a new configuration menu appears, letting you associate any Odoo report (delivery note, batch transfer, invoice...) with a Carbone template in DOCX or XLSX format — in place of the default QWeb report.
2. Prepare a test batch transfer
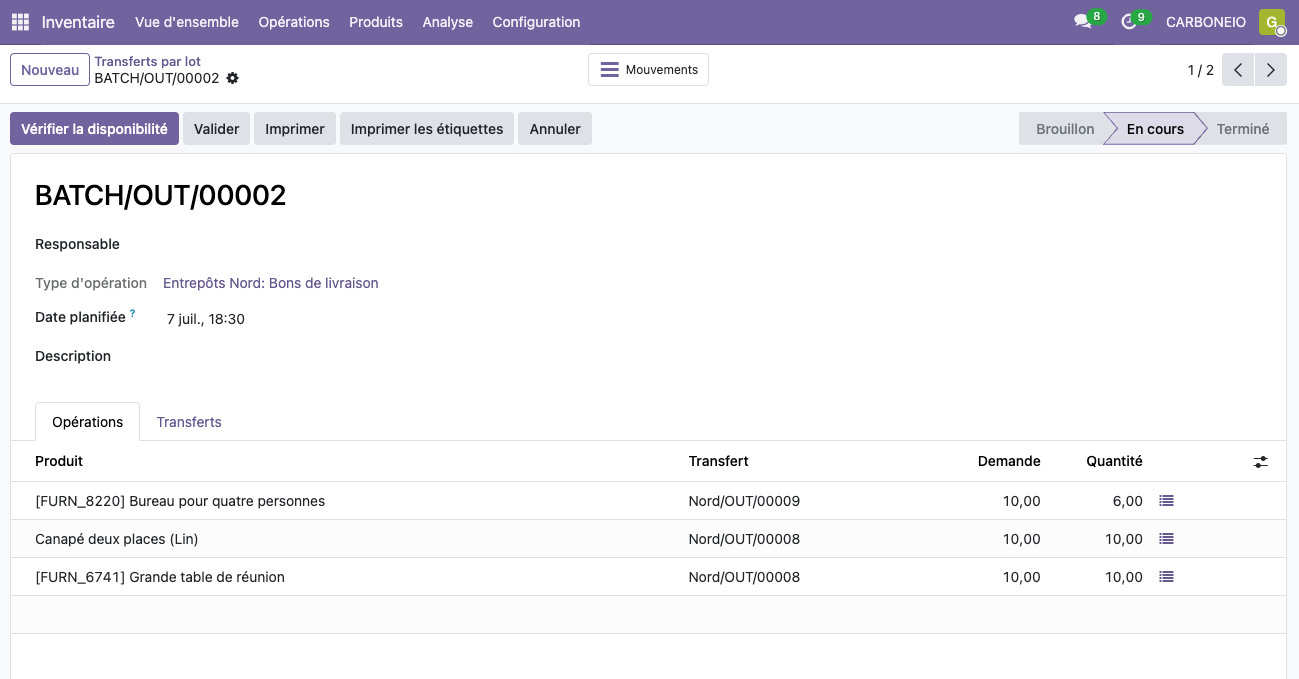
Before building the template, we set up a real case in Odoo:
Inventory > Configuration > Settings→ check that "Batch Transfers" is enabled.Inventory > Transfers > Deliveries→ create two delivery orders for the same customer, each with its own product lines.- On one of them, set a done quantity lower than the demand quantity on a line (for example 7 instead of 10) — this is what will let us test automatic backorder detection.
Inventory > Batch Transfers→ create a batch and add the two delivery orders to it.
3. Link the Carbone template to the report
The full template used in this article is available for download below:
You can use it as-is to follow the tutorial, or as a starting point for your own document — it's an ordinary Word file, and every element (logo, columns, notes) is edited directly in Word.
On the configuration side, once the module is installed:
- Enter your Carbone API key in the module settings (create an account on carbone.io to get one — or point to your On-Premise instance).
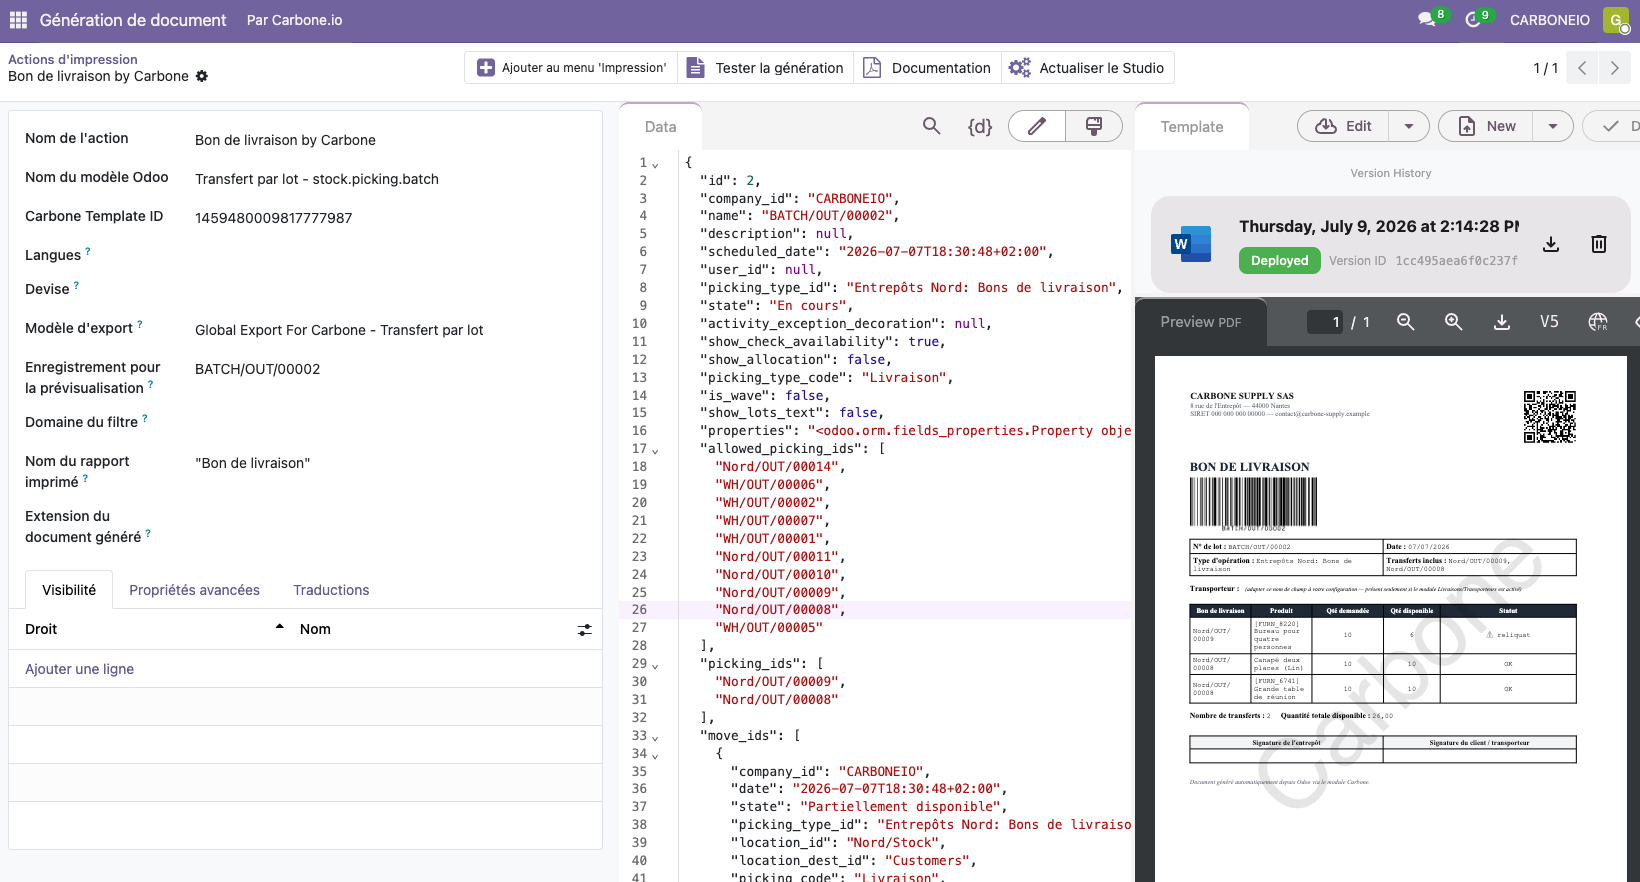
- Open the Carbone reports configuration and create an entry for the Batch Transfer model (
stock.picking.batch). - Upload the
.docxfile as the template linked to this report, and choose the desired output format (PDF for printing, or DOCX if the document should stay editable). - Click "Add to the Print menu": this is what makes the report show up in the batch transfer's Print menu, alongside the native reports.
From there, every batch transfer printout will go through Carbone instead of the native QWeb rendering. To adjust the document later, you just replace the uploaded file — no restart, no module update.
4. Understanding and building the Word template
The Carbone principle fits in one sentence: the template is an ordinary Word document in which you insert tags between curly braces ({d.name}, {d.move_ids[i].product_id}...) wherever data should appear. At generation time, Carbone merges the JSON sent by Odoo with the template: each tag is replaced by its value, lines marked [i] are repeated for every item in a list, and conditional blocks appear or disappear depending on the data. The formatting (fonts, tables, colors, headers) stays whatever the Word document defines — Carbone only touches the content.
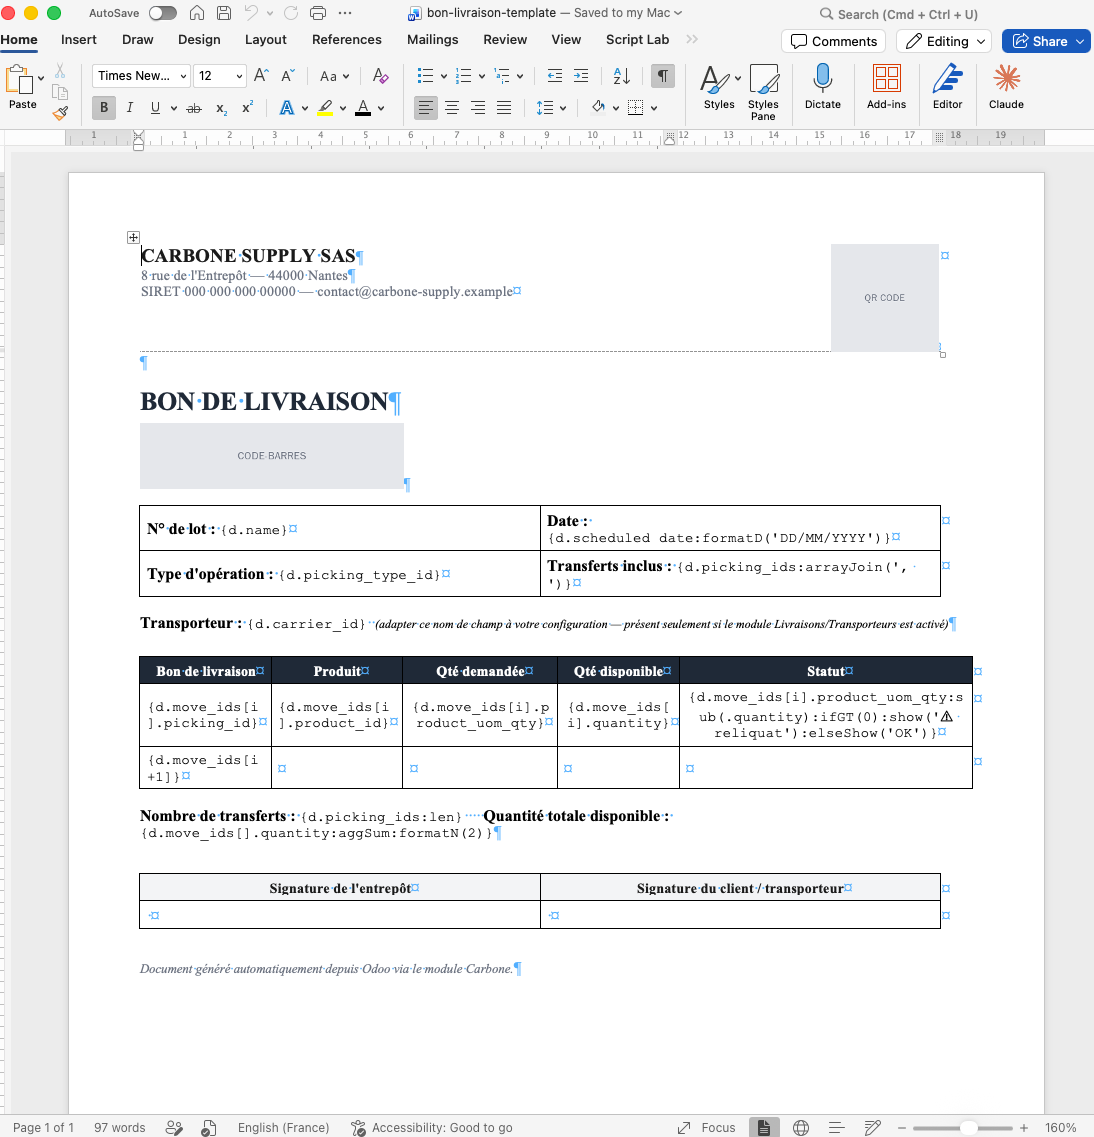
Let's go through each part of the document.
Company header + QR code
At the top of the document, a classic block (company name, address) and a tracking QR code. The QR code is a "placeholder" image inserted in Word, whose alt text contains the Carbone tag:
{d.name:prepend('https://tracking.example-carrier.com/do/'):barcode(qrcode,eclevel:M)}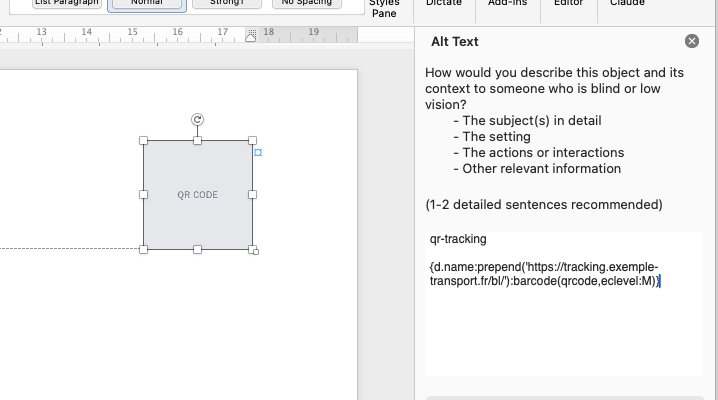
Carbone replaces the image with the generated QR code, sized to the placeholder defined in the template.
A barcode for warehouse scanning
Same principle, with a Code128 barcode under the title, in the alt text of a second image:
{d.name:barcode(code128,includetext:true,textsize:10)}Document header
Batch number, date, operation type, and the list of included transfers — simple fields to insert, each matching a piece of information shown as-is on the transfer in Odoo:
Batch no.: {d.name}                          Date: {d.scheduled_date:formatD('MM/DD/YYYY')}
Operation type: {d.picking_type_id}          Transfers included: {d.picking_ids:arrayJoin(', ')}
arrayJoin turns the list of delivery orders in the batch directly into a readable comma-separated line — handy for avoiding a loop just for a simple summary.
The product list, across all transfers
Each product line from a stock move (stock.move) is looped over, with its source delivery order, the demand quantity, and the available quantity:
{d.move_ids[i].picking_id}   {d.move_ids[i].product_id}   {d.move_ids[i].product_uom_qty}   {d.move_ids[i].quantity}   [status]
{d.move_ids[i+1]}
Flagging a backorder, in a single tag
{d.move_ids[i].product_uom_qty:sub(.quantity):ifGT(0):show('⚠ backorder'):elseShow('OK')}One chained formatter: subtract the available quantity from the demand quantity, then show the note only if the result is positive. No intermediate field and no logic needed on the Odoo side — this is exactly the case we set up in step 2.
Totals
Number of transfers: {d.picking_ids:len}
Total available quantity: {d.move_ids[].quantity:aggSum:formatN(2)}
:len counts the number of delivery orders in the batch, and :aggSum aggregates a value across all lines, with no explicit loop needed for a total.
5. Generate the document
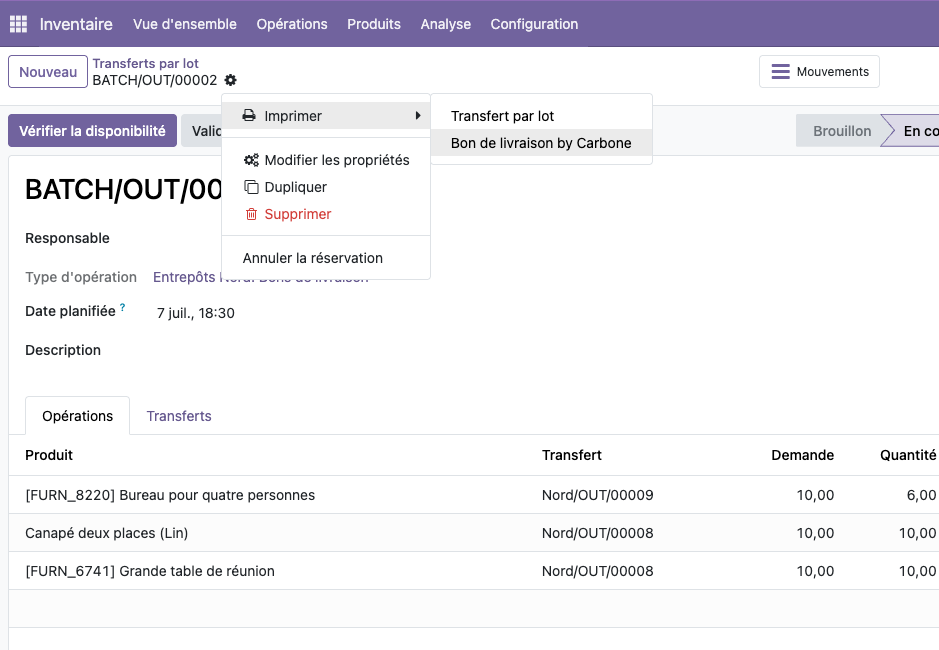
Back on the batch transfer created in step 2: a click on Print now generates the delivery note as a PDF (or Word, if the document should stay editable), with:
- the backordered line flagged automatically,
- the QR code and barcode generated on the fly,
- a layout that business teams can edit entirely, with no ticket and no line of code.
Going further
The delivery note is just one example: the same approach applies to every document Odoo generates — quotations, invoices, contracts, payslips, labels, inventory reports... — and to every output format (PDF, Word, Excel, PowerPoint, ODT). A single template per document type is enough, whatever format is requested at generation time.
- Full documentation of Carbone tags and formatters: https://carbone.io/documentation/design/overview/getting-started.html
- Carbone module on the Odoo Apps Store: https://apps.odoo.com/apps/modules/19.0/report_carbone
Other Carbone formatters are worth exploring for this kind of document:
:color: apply a dynamic color to a cell or a row based on a condition — for example a backordered line highlighted in red, rather than just a text note.:html: if your delivery note includes a notes or instructions field entered as rich text in Odoo, this formatter injects it as-is (bold, lists...) into the generated document.
Finally, Carbone also comes in an On-Premise edition: the rendering engine runs directly in your own infrastructure rather than through the Cloud API — often a deciding factor for organizations bound by data residency or confidentiality requirements (public sector, healthcare, finance...). More information : https://carbone.io/documentation/developer/on-premise-installation/introduction.html