
Self-hosted deployment
Deploy on AWS
Generate and manage your reports inside your own AWS infrastructure
Introduction
Get a dedicated Carbone instance in your AWS private Cloud in just a few minutes via the AWS marketplace.
Benefits
Carbone On-AWS provides the same API as the Carbone Cloud API, with the following benefits:
- 🔐 The instance runs in your private AWS VPC with all your security requirements. Templates, data-set and generated documents are not leaving your infrastructure.
- 🚀 Runs without internet access.
- ⚡️ Install in a few minutes.
- ✅ Easy to pay, you are billed according to your usage and the invoicing will be available on your AWS account.
- All entreprise features (dynamic images, colors, html rendering, ...).
- A stateless Carbone Studio with basic authentication (Web interface to design and preview documents)
- Customise storage, and authentication thanks to NodeJS plugins.
- SLA Support.
- All incoming new features, updates and fixes.
If you have questions, reach us on the chat or by email: contact@carbone.io.
Quickstart
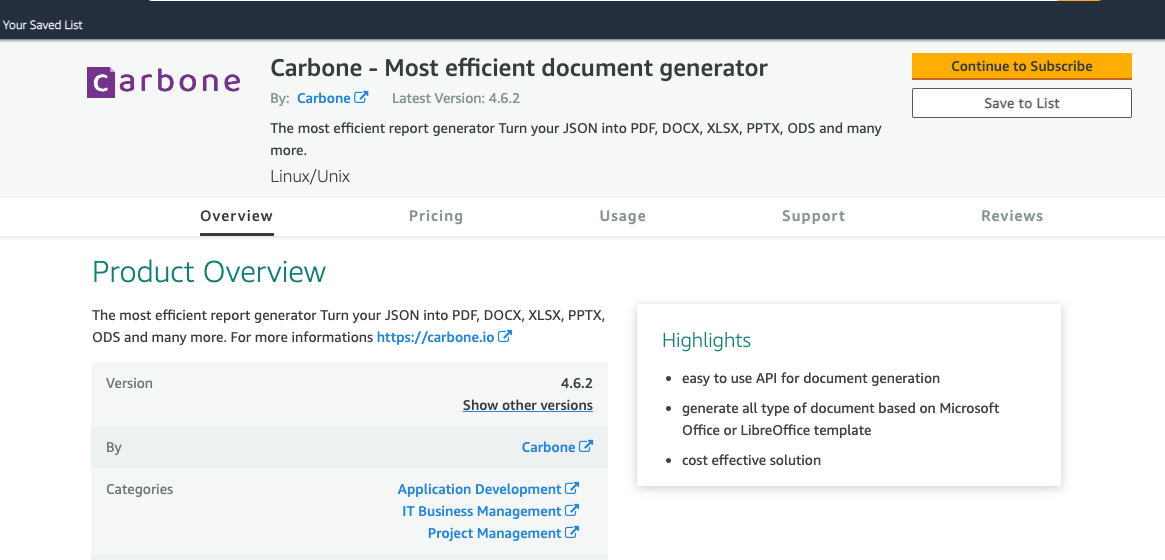
Subscribe to Carbone
- Go to the AWS product sheet
- And click on "Continue to Subscribe"
- 🎉 It's done
First Carbone run
Go to AWS Marketplace > Manage subscriptions console
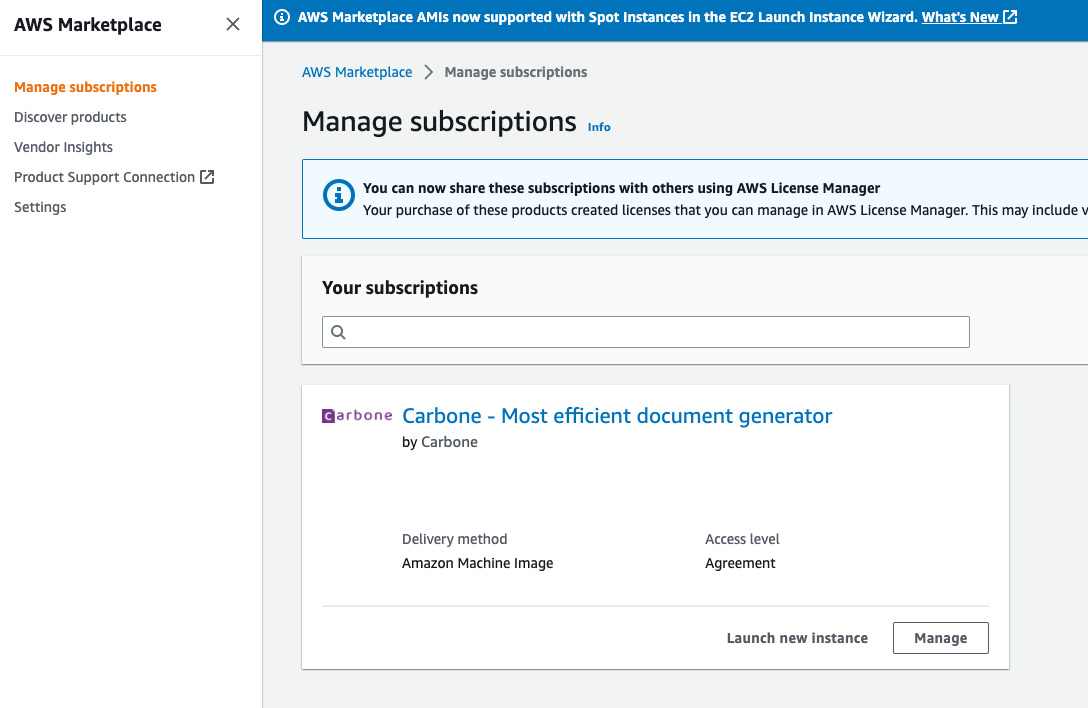
Click on "Launch new instance
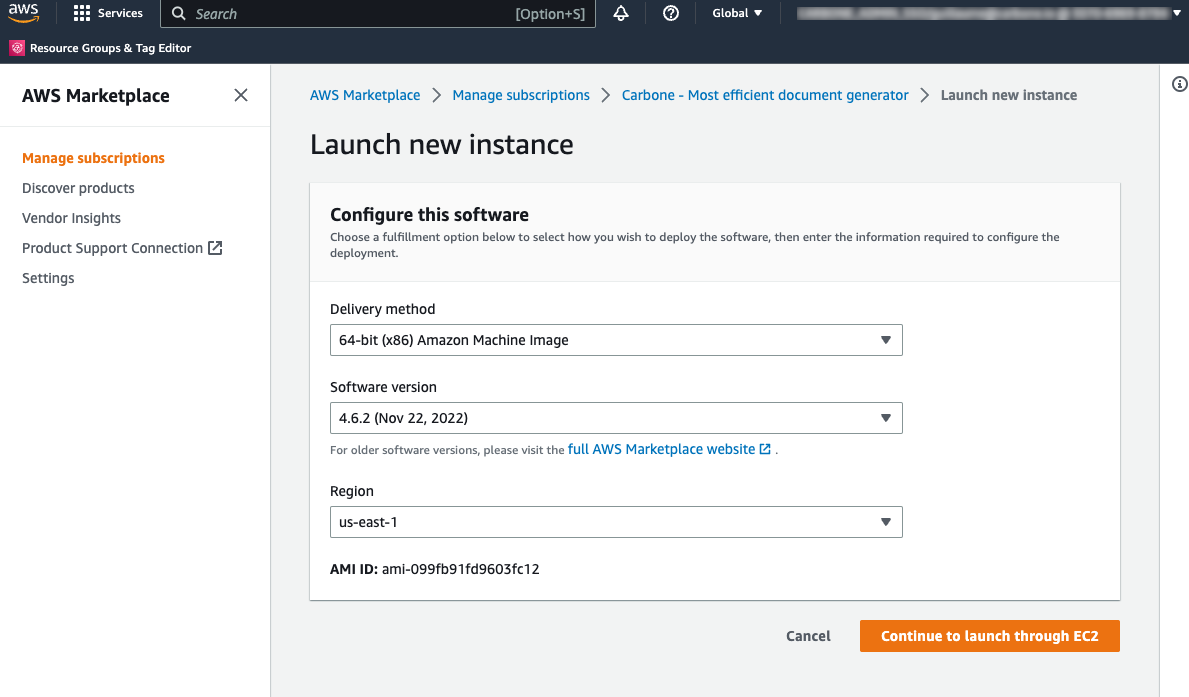
Select Carbone version, region and click on "Continue to launch through EC2"
Click on "Cancel" to keep default settings
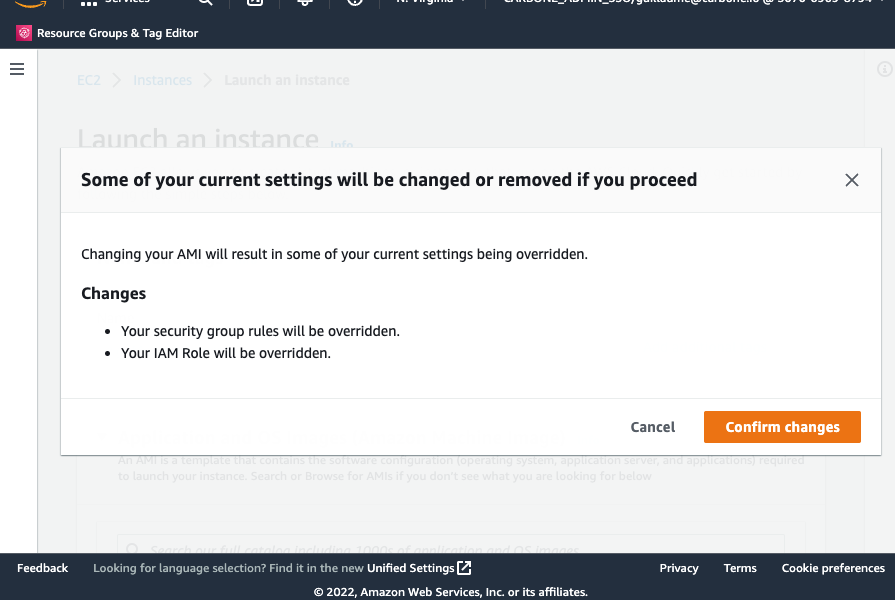
Review EC2 options. Before launching EC2 Carbone instance, please check following options:
- Security group: It must contain at least one "Inbound rules" allowing
TCP/4000from API users - IAM role: Attach to the instance the following policy:
{
    "Version": "2012-10-17",
    "Statement": [
        {
            "Action": [
                "aws-marketplace:MeterUsage"
            ],
            "Effect": "Allow",
            "Resource": "*"
        }
    ]
}
- Security group: It must contain at least one "Inbound rules" allowing
Enjoy 🎉
Verify the Carbone instance is running with the following command:
curl http://"EC2_IP"/status

## Expected result : {"success":true,"code":200,"message":"OK","version":"4.22.13"}
Configuration
There are two ways of configuring Carbone on AWS.
Options via Parameter Store (recommended, >v4.22.13)
This method allows you to generate Carbone parameters outside the instance by configuring TAGs on the instance and setting them with the AWS Systems Manager product.
The first step is to enrich the IAM role of your Carbone instance with the following policy:
{
    "Version": "2012-10-17",
    "Statement": [
        {
            "Effect": "Allow",
            "Action": "ssm:GetParameter",
            "Resource": "*"
        },
        {
            "Effect": "Allow",
            "Action": "ssm:DescribeParameters",
            "Resource": "*"
        },
        {
            "Effect": "Allow",
            "Action": "ec2:DescribeTags",
            "Resource": "*"
        }
    ]
}
Carbone will now get CARBONE_EE_*, CARBONE_S3_* and CARBONE_PUBKEY parameters stored in Parameter Store to get running configuration.
For example, to enable Studio :
Access to Parameter Store in AWS Systems Manager : Systems Manager
Create parameter : CARBONE_EE_studio with value true
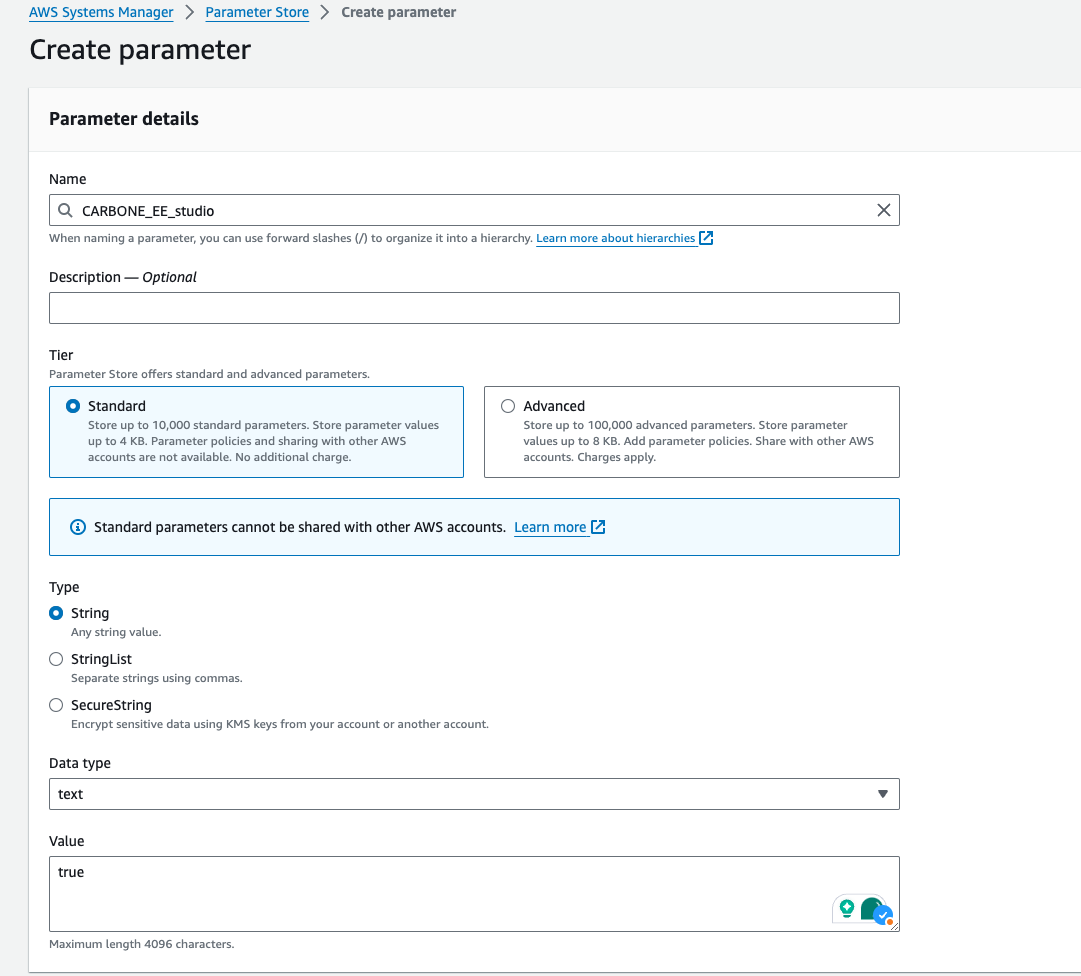
Restart EC2 instance
🎉 Studio is now enabled on your Carbone instance
List of Carbone parameters
Here is the list of parameters you can configure. Please note that the parameters are case sensitive:
- CARBONE_EE_port
- CARBONE_EE_factories
- CARBONE_EE_attempts
- CARBONE_EE_authentication
- CARBONE_EE_studio
- CARBONE_EE_studioUser
- CARBONE_EE_maxDataSize
- CARBONE_EE_maxTemplateSize
- CARBONE_EE_templatePathRetention
- CARBONE_EE_lang
- CARBONE_EE_timezone
- CARBONE_EE_currencySource
- CARBONE_EE_currencyTarget
- CARBONE_EE_converterFactoryTimeout
- CARBONE_EE_xlsmEnabled
- CARBONE_EE_collectStatistics
- CARBONE_S3_templateS3BucketRegion
- CARBONE_S3_templateS3Bucket
- CARBONE_S3_templateS3Folder
- CARBONE_S3_renderS3Bucket
- CARBONE_S3_renderS3Folder
- CARBONE_PUBKEY
Use different configuration for several Carbone instances
If you have several Carbone instances and want to configure them differently, you can add the TAG CARBONE_CONFIG_PREFIX to configure a prefix that will be used to retrieve the options.
For example the following configuration:
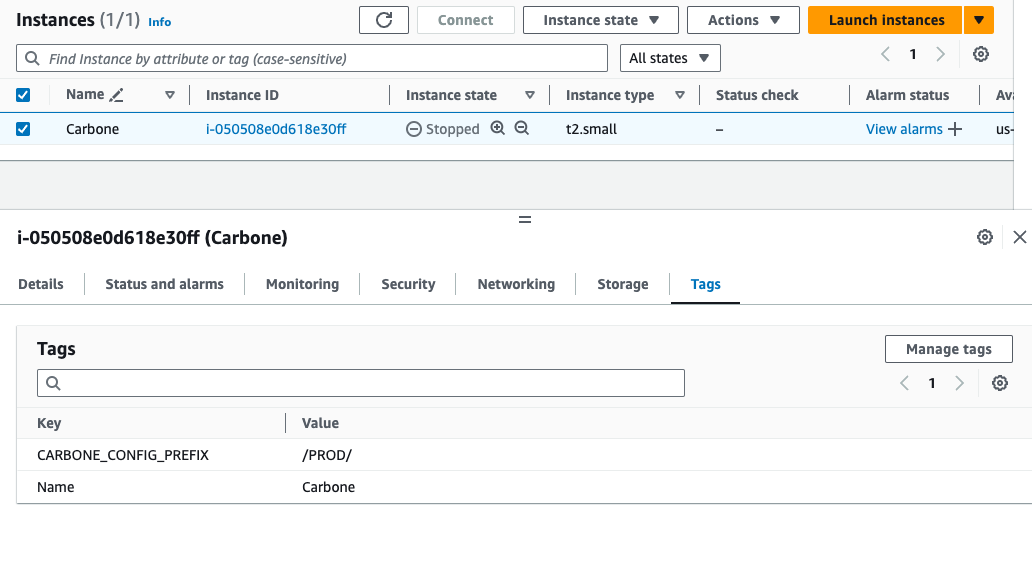
Will use the /PROD/CARBONE_EE_* options
Options via config.json (legacy method)
You can configure Carbone on AWS in the same way as Carbone on-premise: Learn how to configure server and enable options
The configuration is accessible by connecting to the EC2 instance in the file /var/www/carbone-ee/config/config.json. We recommend using the carbone user after connecting to the EC2 instance to modify config.json.
After making changes to the config.json file, please restart Carbone with the following command:
sudo systemctl restart carbone-eeStorage backends
You can use create your own JS plugins to customise some part or Carbone : create Carbone Plugins
Sample S3 plugins is included by default to allow you to load and store templates from you S3 bucket.
To use it, you need to configure bucket name and region in file /var/www/carbone-ee/config/config.json with the following options:
    "templateS3Bucket" : "test-stockage-template",
    "templateS3BucketRegion" : "us-east-1",
    "templateS3Folder" : "prod"
Or you can configure following parameters in Systems Manager Parameter store :
- CARBONE_S3_templateS3BucketRegion
- CARBONE_S3_templateS3Bucket
- CARBONE_S3_templateS3Folder
- CARBONE_S3_renderS3Bucket
- CARBONE_S3_renderS3Folder
Authentication is done using EC2 IAM role so you need to add following policy to grant S3 access to your EC2 instance:
{
    "Version": "2012-10-17",
    "Statement": [
        {
            "Sid": "VisualEditor0",
            "Effect": "Allow",
            "Action": [
                "s3:PutObject",
                "s3:GetObject",
                "s3:GetObjectAttributes",
                "s3:ListBucket",
                "s3:DeleteObject"
            ],
            "Resource": [
                "arn:aws:s3:::test-stockage-template",
                "arn:aws:s3:::test-stockage-template/*"
            ]
        }
    ]
}
Authentication
To enable API authentication with a JWT public/private key pair:
Set CARBONE_EE_authentication to
true(Parameter Store) orauthentication: true(config.json)Generate a key pair with the same helper used on Docker and Kubernetes:
docker run -it --platform "linux/amd64" carbone/carbone-ee:slim-5.16.2 generate-keysStore the public key content in the CARBONE_PUBKEY parameter (Parameter Store) or the
publicKeyoption (config.json). Keep the private key secret — it is only used to generate JWT tokens.Generate a JWT token:
docker run -it --platform "linux/amd64" carbone/carbone-ee:slim-5.16.2 generate-token

## Paste in terminal content of key.pem
A JWT token is then displayed in the console. You can then use it in your API calls.
Centralized logging (CloudWatch)
By default Carbone AMI is configured to export application logs on CloudWatch. To enable it, you only need to attach CloudWatchAgentServerPolicy policy on EC2 IAM role.
The logs from the Carbone application are then directly available in the CloudWatch application in log group name carbone-ee.
Scaling and availability
For production traffic, run Carbone behind an Auto Scaling Group and an Application Load Balancer:
- Build a Launch Template from a working Carbone instance, with the IAM role (marketplace metering + Parameter Store + S3, as configured above) and the
CARBONE_CONFIG_PREFIX/CARBONE_EE_*tags attached, so every new instance self-configures identically on boot. - Point the target group's health check at
/statuson port4000. - Store templates and renders on S3 (see Storage backends above) so every instance behind the load balancer shares the same data — a plain Auto Scaling Group does not replicate local disk between instances.
Upgrade Carbone
To update Carbone on AWS, please follow these steps:
Prerequisites:
- Carbone Version N is running in your infrastructure
Upgrade procedure:
We recommend that you configure Carbone via Systems Manager and configure the S3 plugin to store templates. In this case, migration to a new version is transparent.
Otherwise, you need to follow these steps:
- Launch new instance with new version
- Stop Carbone on new instance with :
sudo systemctl stop carbone-ee - Copy /var/www/carbone-ee/config from the previous EC2 instance to the new one
- (If you don't use the S3 plugin to store templates) Copy /var/www/carbone-ee/template from the previous EC2 instance to the new one
- (If you include specific plugins) Copy /var/www/carbone-ee/plugin from the previous EC2 instance to the new one
- Start Carbone
sudo systemctl start carbone-ee - Enjoy 🎉, you can now take advantage of Carbone's new features and destroy the previous Carbone instance
Troubleshooting
Logs access locally
To access to Carbone logs, connect to the EC2 instance with SSH or by the System Manager. Logs are accessible with following command:
journalctl -u carbone-ee -rCannot connect to EC2 instance via SSH
If you try to connect through ssh, please check:
- SSH Key pair was configured when the instance was created
- Security group contains inbound rule allowing
TCP/22
IAM Role errors
If the following error message appears in the logs, it means that the IAM MeterUsage Role is not attached to the EC2 instance.
$ Carbone need acces to AWS Marketplace API to check subscription and report usage. Please check if you ec2 instance have correct IAM rolePlease check following:
- Login to your AWS Management Console, open EC2 Services and click Instances
- Select the new EC2 instance deployed from this AMI and click Actions -> Security -> Modify IAM role
- Click
Create new IAM role(or choose an existing one if created earlier) - Click
Create role, select AWS service and EC2, click Next - Select
AWSMarketplaceMeteringFullAccess, click Next - Provide a Role name (eg carbone-role), click Create role
- In the Modify IAM role browser tab from step 2 above, click the refresh icon, select the new IAM Role, click Update IAM role